1) First I created a directory called:
~/Player_Stage/Laser_Test
Then I created there a file named sick.cfg (This idea was taked from Laura's Blogg).
The content of that file must be:
driver
(
name "sicklms200"
provides ["laser:0"]
port "/dev/ttyUSB1")
Then, after saving it you must execute these commands:
$ robot-player sick.cfg
$ robot-playerv
Then you are supposed to see the scan when you subscribe to the laser sick lms 200.
...
But following these steps I couldn't get the lecture of the laser, instead I got this error:
oscar@oscar-laptop:~/Player_Stage/Laser_Test$ robot-playerv
PlayerViewer 2.0.4
Connecting to [localhost:6665]
calling connect
done
Available devices: localhost:6665
laser:0 sicklms200 ready
playerc error : timed out waiting for server reply to request 6:0:3:1
playerv : error in dev_laser.c
libplayerc error: timed out waiting for server reply to request 6:0:3:1
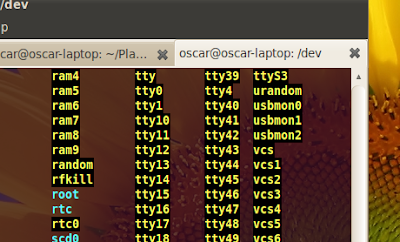
Then reading about the ports I accessed the /dev directory and looked up for the ttyUSB0 port, but I could not fin it. The ports I found that I think may be the usb ports are these:
usbmon0
usbmon1
usbmon2
...
Reading about usbmon on the web I got these info:
"3 The name "usbmon" in lowercase refers to a facility in kernel which is
4 used to collect traces of I/O on the USB bus. This function is analogous
5 to a packet socket used by network monitoring tools such as tcpdump(1)
6 or Ethereal. Similarly, it is expected that a tool such as usbdump or
7 USBMon (with uppercase letters) is used to examine raw traces produced
8 by usbmon.
9
10 The usbmon reports requests made by peripheral-specific drivers to Host
11 Controller Drivers (HCD). So, if HCD is buggy, the traces reported by
12 usbmon may not correspond to bus transactions precisely. This is the same
13 situation as with tcpdump.
So I need the ports ttyUSB0 and ttyUSB1.
Reading on Linux Forums I found this post, and it maybe the main reason of why I don't see the port on /dev:
"I don't know what exactly your device is. But my Palm use ttyUSB0 to sync with Ubuntu. The /dev directory is managed by udev, so every device file is created dynamically. What I see on my system is: when I connect my Palm to the usb port and push the sync button on Palm, the /dev/ttyUSB0 will be created on the fly. And after the sync is over, the /dev/ttyUSB0 gone too. So you might not see the /dev/ttyUSB0 device file if your device is not activated."
The next step is to try again the teleoperation of the Pioneer and see if the ttyUSB0 port is created at that instant.
...
It doesn't work, I get the next error:
ROSARIA/bin$ ./RosAria
[ INFO] [1282178888.412720880]: using serial port: [/dev/ttyUSB0]
ArLog::init: Could not open file aria.log for logging.
Could not connect to simulator, connecting to robot through serial port /dev/ttyUSB0.
ArSerialConnection::open: Could not open serial port '/dev/ttyUSB0'
Could not connect, because open on the device connection failed.
Failed to connect to robot.
rotate: Could not connect to robot! Exiting.
setup failed...
I don't have any idea of why ttyUSB0 doesn't appear. I will continue tomorrow.
------------------------------------------------------------------------------------
Testing the Laser With Aria.
First change the port from COM3 to ttyUSB0 (It depends in where you want to listen the Laser) in line 110 of p3dx.p in .../Aria/Aria/params
miércoles, 18 de agosto de 2010
Starting with p2os
1) Install p2os following the p2os Getting Started Tutorial
2) Then I Tested the communication with the robot using RosAria.
First I Changed the usb port from port 1 to port 0. To do this you need to go to the ROASRIA package.
$ roscd ROSARIA
$ cd src
Then edit the RosAria.cpp file.
$ sudo gedit RosAria.cpp
and edit the line 80:
to
Make the package and then move to ROSARIA/bin
Then run a Core
$ roscore
Turn on the Pioneer, connect the usb-serial cable and run RosAria
./RosAria.
Finally you should see something like this:
Retrieving information about robot's odometry.
You can also consult my other post to see the next steps about how to control the robot with the keyboard:
Controling Pioneer
2.1) Using the Keyboard to contorl de Pioneer.
Following the instructions of my other post I culnd't teleoperate the robot. I think is is because the latest relese of the svn of teleop_base publishes on a topic named /cmd_vel instead of /RosAria/cmd_vel. So now i'm modifying the RosAria.cpp file so it listens /RosAria/cmd_vel topic.
Note: It is localized in ROSARIA/src and the code i'm modifying is in the line 95 from this:
cmdvel_sub = n.subscribe( "/cmd_vel", 1, (boost::function < void(const geometry_msgs::TwistConstPtr&)>)
To this:
cmdvel_sub = n.subscribe( "/RosAria/cmd_vel", 1, (boost::function < void(const geometry_msgs::TwistConstPtr&)>)
Well Now the robot moves, but there's a little problem with RosAria, because it suddenly stops and the communication with the robot freezes. It stop updating the info...
[ INFO] [1282152720.503071698]: /odom: 1282152720.503030 0.000000 0.000000
It stops there. I will search for the problem later, now I will focus on the next task.
3)
2) Then I Tested the communication with the robot using RosAria.
First I Changed the usb port from port 1 to port 0. To do this you need to go to the ROASRIA package.
$ roscd ROSARIA
$ cd src
Then edit the RosAria.cpp file.
$ sudo gedit RosAria.cpp
and edit the line 80:
n.param( "port", serial_port, std::string("/dev/ttyUSB1") );
to
n.param( "port", serial_port, std::string("/dev/ttyUSB0") );
Make the package and then move to ROSARIA/bin
Then run a Core
$ roscore
Turn on the Pioneer, connect the usb-serial cable and run RosAria
./RosAria.
Finally you should see something like this:
Retrieving information about robot's odometry.
You can also consult my other post to see the next steps about how to control the robot with the keyboard:
Controling Pioneer
2.1) Using the Keyboard to contorl de Pioneer.
Following the instructions of my other post I culnd't teleoperate the robot. I think is is because the latest relese of the svn of teleop_base publishes on a topic named /cmd_vel instead of /RosAria/cmd_vel. So now i'm modifying the RosAria.cpp file so it listens /RosAria/cmd_vel topic.
Note: It is localized in ROSARIA/src and the code i'm modifying is in the line 95 from this:
cmdvel_sub = n.subscribe( "/cmd_vel", 1, (boost::function < void(const geometry_msgs::TwistConstPtr&)>)
To this:
cmdvel_sub = n.subscribe( "/RosAria/cmd_vel", 1, (boost::function < void(const geometry_msgs::TwistConstPtr&)>)
Well Now the robot moves, but there's a little problem with RosAria, because it suddenly stops and the communication with the robot freezes. It stop updating the info...
[ INFO] [1282152720.503071698]: /odom: 1282152720.503030 0.000000 0.000000
It stops there. I will search for the problem later, now I will focus on the next task.
3)
viernes, 13 de agosto de 2010
Simulating two robots in ROS
Following the instructions published in assembla I got the following results:
1.- First I created the file: twoRobots.launch in the directory:
And then I updated the file tworobots.launch located in:
2.- Run de launch file: roslaunch launch/tworobots.launch
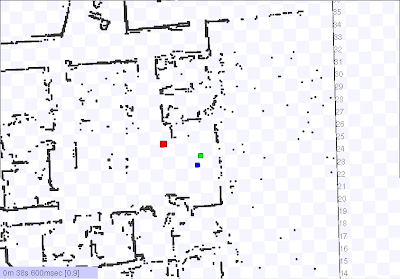
Now we can see the two robots on the map.
3.- Control the robots with the keyboard launching the tworobots2.launch file.
To control one robot I only need to use the keyboard while the terminal running tworobots.launch is in front of the other windows. To control de second robot I need to do the same thing but with the terminal running tworobots2.launch
Test Navigation Stack with both robots.
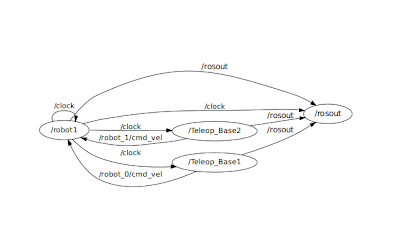
Here we can see the nodes teleop_base1 and teleop_base2, as well as the topics of cmd_vel for robot0 and robot1.
The odometry of both robots is done separately, in this case we can't see the lasers of the robots on the map because of the version of ROS and the Ubuntu Release that I have. I really don't know why that problem exists but I hope I will know how to solve it soon.
Regards.
1.- First I created the file: twoRobots.launch in the directory:
/opt/ros/cturtle/stacks/simulator_stage/stage/world
And then I updated the file tworobots.launch located in:
/opt/ros/cturtle/stacks/sscrovers-ros-pkg/launch
2.- Run de launch file: roslaunch launch/tworobots.launch
Now we can see the two robots on the map.
3.- Control the robots with the keyboard launching the tworobots2.launch file.
To control one robot I only need to use the keyboard while the terminal running tworobots.launch is in front of the other windows. To control de second robot I need to do the same thing but with the terminal running tworobots2.launch
Test Navigation Stack with both robots.
Here we can see the nodes teleop_base1 and teleop_base2, as well as the topics of cmd_vel for robot0 and robot1.
The odometry of both robots is done separately, in this case we can't see the lasers of the robots on the map because of the version of ROS and the Ubuntu Release that I have. I really don't know why that problem exists but I hope I will know how to solve it soon.
Regards.
Etiquetas:
cmd_vel,
launch,
navigation,
teleop_base,
twoRobots,
tworobots2
miércoles, 11 de agosto de 2010
ROSDEP
This is a little post of how to use rosdep.
Use rosdep and rosmake to build any package in the ROS repository.
"Say that you want to build a package called AMAZING_PACKAGE, that you hadn't built on your machine before."
"What's happening under the hood"
1. rosdep uses rosmake to find all system dependencies recursively
2. rosdep looks up how to resolve the system dependencies for the OS running using the rosdep.yaml files.
3. rosdep tries to detect what is installed on your system already
4. rosdep generates a bash script to install all missing system dependencies
5. rosdep executes the bash script
To view the bash script before executing run
rosdep satisfy AMAZING_PACKAGE
Use rosdep and rosmake to build any package in the ROS repository.
"Say that you want to build a package called AMAZING_PACKAGE, that you hadn't built on your machine before."
rosdep install AMAZING_PACKAGE
"What's happening under the hood"
1. rosdep uses rosmake to find all system dependencies recursively
2. rosdep looks up how to resolve the system dependencies for the OS running using the rosdep.yaml files.
3. rosdep tries to detect what is installed on your system already
4. rosdep generates a bash script to install all missing system dependencies
5. rosdep executes the bash script
To view the bash script before executing run
rosdep satisfy AMAZING_PACKAGE
Understanding how tf is generated
First of all consult this Tutorial: Introduction to tf
Here you can see how to use these basic tf tools:
> view_frames: creates a diagram of the frames being broadcast by tf over ROS.
$ rosrun tf view_frames
Here a tf listener is listening to the frames that are being broadcast over ROS and drawing a tree of how the frames are connected. To view the tree:
$ evince frames.pdf
This is an example of the tf tree of the activity of the first ticket of Assembla in the projecto of SSC-ITESM.
If you know the frames involved, you can ask tf_echo to report the transform between any two frames broadcast over ROS.
Usage:
rosrun tf tf_echo [reference_frame] [target_frame]
"Let's look at the transform of the turtle2 frame with respect to turtle1 frame which is equivalent to \large{$$\mathbf{T}_{turtle1\_turtle2} =\mathbf{T}_{turtle1\_world} *\mathbf{T}_{world\_turtle2}$$} :
$ rosrun tf tf_echo turtle1 turtle2
------
Next I read this Tutorial "Leraning tf" all in cpp: Learning tf
1) Writing a tf broadcaster (C++):
Etiquetas:
evince,
tf,
tf_broadcaster,
tf_echo,
view_frames
martes, 10 de agosto de 2010
Functionality of the topics used in do-slam-navigation.launch
1) Run do-slam-navigation.launch
roslaunch launch/do-slam-navigation.launch
2) In a new terminal run rxgraph.
The nodes involved when launching do-slam-navigation.launch are the following:
/amcl
/Gmapping
/move_base_node
/Stage_Sim
/Teleop_Base
/TF_Broadcaster
/rosout
We can see how nodes communicate each other by messages through topics with the following diagram (rxgraph):
3) We can see using rxgraph to wich topic each node sobscribes or publishes. Fow example if we click on the node /Stage_Sim we get this info:
Then we can see that it publishes in these topics:
* /base_scan [sensor_msgs/LaserScan]
* /rosout [roslib/Log]
* /tf [tf/tfMessage]
* /clock [roslib/Clock]
* /odom [nav_msgs/Odometry]
* /base_pose_ground_truth [nav_msgs/Odometry]
And subscribes to these other topics:
* /clock [roslib/Clock]
* /cmd_vel [geometry_msgs/Twist]
-----
As seen on the rxgraph the topics involved are:
/clock "It is used to published simulated time within a runtime system."
/tf "Current transform tree. This is the normal /tf topic."
/map "Get the map data from this topic, which is latched, and updated periodically."
/cmd_vel "velocity commands to differentially drive the position of the robot."
/rosout "Standard ROS topic for publishing logging messages."
/base_scan
roslaunch launch/do-slam-navigation.launch
2) In a new terminal run rxgraph.
The nodes involved when launching do-slam-navigation.launch are the following:
/amcl
/Gmapping
/move_base_node
/Stage_Sim
/Teleop_Base
/TF_Broadcaster
/rosout
We can see how nodes communicate each other by messages through topics with the following diagram (rxgraph):
3) We can see using rxgraph to wich topic each node sobscribes or publishes. Fow example if we click on the node /Stage_Sim we get this info:
Node [/Stage_Sim]
Publications:
* /base_scan [sensor_msgs/LaserScan]
* /rosout [roslib/Log]
* /tf [tf/tfMessage]
* /clock [roslib/Clock]
* /odom [nav_msgs/Odometry]
* /base_pose_ground_truth [nav_msgs/Odometry]
Subscriptions:
* /clock [roslib/Clock]
* /cmd_vel [geometry_msgs/Twist]
Services:
* /Stage_Sim/set_logger_level
* /Stage_Sim/get_loggers
Pid: 14092
Connections:
* topic: /rosout
* to: /rosout
* direction: outbound
* transport: TCPROS
* topic: /tf
* to: /Gmapping
* direction: outbound
* transport: TCPROS
* topic: /tf
* to: /move_base_node
* direction: outbound
* transport: TCPROS
* topic: /tf
* to: /amcl
* direction: outbound
* transport: TCPROS
* topic: /base_scan
* to: /move_base_node
* direction: outbound
* transport: TCPROS
* topic: /clock
* to: /Stage_Sim
* direction: outbound
* transport: INTRAPROCESS
* topic: /clock
* to: /Gmapping
* direction: outbound
* transport: TCPROS
* topic: /clock
* to: /TF_Broadcaster
* direction: outbound
* transport: TCPROS
* topic: /clock
* to: /move_base_node
* direction: outbound
* transport: TCPROS
* topic: /clock
* to: /amcl
* direction: outbound
* transport: TCPROS
* topic: /clock
* to: /Teleop_Base
* direction: outbound
* transport: TCPROS
* topic: /clock
* to: http://oscar-laptop:56712/
* direction: inbound
* transport: INTRAPROCESS
* topic: /cmd_vel
* to: http://oscar-laptop:45548/
* direction: inbound
* transport: TCPROS
* topic: /cmd_vel
* to: http://oscar-laptop:58957/
* direction: inbound
* transport: TCPROS
Then we can see that it publishes in these topics:
* /base_scan [sensor_msgs/LaserScan]
* /rosout [roslib/Log]
* /tf [tf/tfMessage]
* /clock [roslib/Clock]
* /odom [nav_msgs/Odometry]
* /base_pose_ground_truth [nav_msgs/Odometry]
And subscribes to these other topics:
* /clock [roslib/Clock]
* /cmd_vel [geometry_msgs/Twist]
-----
As seen on the rxgraph the topics involved are:
/clock "It is used to published simulated time within a runtime system."
/tf "Current transform tree. This is the normal /tf topic."
/map "Get the map data from this topic, which is latched, and updated periodically."
/cmd_vel "velocity commands to differentially drive the position of the robot."
/rosout "Standard ROS topic for publishing logging messages."
/base_scan
lunes, 9 de agosto de 2010
How to know to wich topic a node subscribes or publishes
We can know to wich topic a node subscribes or publishes by viewing carefully the .cpp file of the node. Along the code you can find the name of the topic to which the node subscribes or publish, for example:
ros::Publisher chatter_pub = n.advertise<std_msgs::String>("chatter", 1000);
In this line you can see that the node publishes to the "chatter" topic, and that the message is of the type of std_msgs/String
ros::Subscriber sub = n.subscribe("chatter", 1000, chatterCallback);
In this other example you can see that the node subscribes to the "chatter" topic.
For more information: Writing a Simple Publisher and Subscriber (C++)
Etiquetas:
.cpp,
node,
publisher,
subscriber,
topic
Launch File Configuration - Tag Reference
The launch file is an XML code that describes how the nodes of a package are configured. It consists of the following tags (Not all of them are always necessary):
<launch>
It is used as a container of the other tags. It is the root element of any roslaunch file. As any XML file it starts with and ends with . In this case this tag is always at the beginning and the end of every launch file.
<node>
The node tag specifies a node that you want to have launched. It brings up and takes down nodes.
Note: "roslaunch does not provide any guarantees about what order nodes start in. This is intentional: there is no way to externally know when a node is fully initialized, so all code that is launched must be robust to launching in any order"
<machine>
This tag declares a machine that runs ROS nodes on. "It is mainly used to declare SSH and ROS environment variable settings for remote machines".
Attributes:
name, address, ros-root, ros-package-path, default, user, password and timeout.
It's only Element is: env.
More info about this tag in:
Note: "You do not need this tag if you are launching all the nodes locally"
<include>
This tag allows you to include another roslaunch file into your current file.
Attributes: file, ns, clear_params.
More info about this tag in: <include>
<remap>
"The tag allows you to pass in name remapping arguments to the ROS node that you are launching in a more structured manner than setting the args attribute of a directly"
Attributes:
from, to.
More info about this tag in:
<env>
This tag allows you to set environment variables on nodes that are launched in the XML file.
Attributes:
name, value.
More info about this tag in:
<param>
Instead of a value you can specify a textfile or binfile attribute to set the value of a parameter to be set on the Parameter Server.
Attributes:
name, value, type, textfile, binfile, command.
More info about this tag in:
<rosparam>
"The tag enables the use of rosparam YAML files for loading and dumping parameters from the ROS Parameter Server. It can also be used to remove parameters."
Attributes:
command, file, param and ns.
More info about this tag in:
Note: The attribute ns is deprecated.
<group>
With this tag you can apply settings to a defined group of nodes.
Attributes:
ns, clear_params.
More info about this tag in:
<test>
This node is like a tag, but the difference is that it refers to a test node.
More info about this tag in:
<arg>
"The tag allows you to create more re-usable and configurable launch files by specifying values that are passed via the command-line, passing in via an , or declared for higher-level files."
More info about this tag in:
---
Key Concepts:
Parameter Server: "A parameter server is a shared, multi-variate dictionary that is accessible via network APIs. Nodes use this server to store and retrieve parameters at runtime. As it is not designed for high-performance, it is best used for static, non-binary data such as configuration parameters. It is meant to be globally viewable so that tools can easily inspect the configuration state of the system and modify if necessary. "
---
More information available at: ROSLAUNCH/XML
The examples showed in this post are from the same link.
Also if you need to learn XML you can use this free tutorial: XML Tutorial
<launch>
It is used as a container of the other tags. It is the root element of any roslaunch file. As any XML file it starts with
<node>
The node tag specifies a node that you want to have launched. It brings up and takes down nodes.
Note: "roslaunch does not provide any guarantees about what order nodes start in. This is intentional: there is no way to externally know when a node is fully initialized, so all code that is launched must be robust to launching in any order"
<machine>
This tag declares a machine that runs ROS nodes on. "It is mainly used to declare SSH and ROS environment variable settings for remote machines".
Attributes:
name, address, ros-root, ros-package-path, default, user, password and timeout.
It's only Element is: env.
More info about this tag in:
Note: "You do not need this tag if you are launching all the nodes locally"
<include>
This tag allows you to include another roslaunch file into your current file.
Attributes: file, ns, clear_params.
More info about this tag in: <include>
<remap>
"The
Attributes:
from, to.
More info about this tag in:
<env>
This tag allows you to set environment variables on nodes that are launched in the XML file.
Attributes:
name, value.
More info about this tag in:
<param>
Instead of a value you can specify a textfile or binfile attribute to set the value of a parameter to be set on the Parameter Server.
Attributes:
name, value, type, textfile, binfile, command.
More info about this tag in:
<rosparam>
"The
Attributes:
command, file, param and ns.
More info about this tag in:
Note: The attribute ns is deprecated.
<group>
With this tag you can apply settings to a defined group of nodes.
Attributes:
ns, clear_params.
More info about this tag in:
<test>
This node is like a
More info about this tag in:
<arg>
"The
More info about this tag in:
---
Key Concepts:
Parameter Server: "A parameter server is a shared, multi-variate dictionary that is accessible via network APIs. Nodes use this server to store and retrieve parameters at runtime. As it is not designed for high-performance, it is best used for static, non-binary data such as configuration parameters. It is meant to be globally viewable so that tools can easily inspect the configuration state of the system and modify if necessary. "
---
More information available at: ROSLAUNCH/XML
The examples showed in this post are from the same link.
Also if you need to learn XML you can use this free tutorial: XML Tutorial
rviz Main Configuration Elements
rviz
This is how the dashboard looks:
It's main components are:
Displays: This are the different options to visualize the information obtained from the laser, the sonar, the camera, the encoders etc. any sensor that ROS can read. Also we can display different marks or grids to make ouy visualization easier.
These are some of the displays we can activate:
Axes, camera, grid, grid cells, laser scan, map, markers, path, pose, pose array, point cloud, polygon, odometry, robot model, tf.
They are fully explain on the USER'S GUIDE
Coordinate frames: rviz uses tf transform system to for transforming data from the coordinate frame it arrives into a global reference frame.
Tools:
> Move Camera
> Select parts of the 3D Robot
> Navigation Goal
> Estimate the 2D pose
Tool properties:
Time: "It allows you to see how much ROS Time time has passed, vs. how much "Wall Clock" (aka real) time has passed."
Plugins: Thera are some plugins that can be added to rviz. They can be installed in the plugins->manage.
This info is taked from the User's guide or ROS.org in:
rviz USER GUIDE
tf view_frames and tf_echo
These are two of the basic tools to use:
> view_frames: This tool creates a diagram of frames that are being broadcast by tf over ROS.
$ rosrun tf view_frames
It draws a tree of how the frames are connected, to see it use the next command:
$ evince frames.pdf
> tf_echo
tf_echo reports a transform between two frames broadcast over ROS. To use it you need to specify both frames in the command line.
like this:
rosrun tf tf_echo [reference_frame] [target_frame]
Etiquetas:
evince,
frame,
tf,
tf_echo,
view_frames
Suscribirse a:
Entradas (Atom)