domingo, 26 de septiembre de 2010

miércoles, 22 de septiembre de 2010
move_base_stage Tutorial
Following the tutorial of amazing ROS in: http://www.ros.org/wiki/move_base_stage/Tutorials/stage%20and%20navigation%20stack
...
Well trying the tutorial everything went fine until I followed the step #5. At the last command I recieved an error message like this:

So I went to the .cc code and found the part of the code where that error message was generated:

I coulnd't find where actually the error was, so I decided to change the !=4 to !=3 and see what happens...
After making stage I ran the willow.world once again...
It didn't work, I changed the values first and then the message and it didn't change, I also rosmake stage and nothing... It seems to bee usign another code, because in all the extension of the model.cc there is no other message like that, I also might be reading a copy of that code in another part... so I will follow all the instructions again and see if it works well...
---
roscp is a useful commandline tool for copying files from one package to another.
pr2 throws a robot on map =D
------
map_server
Provides the map_server ROS Node, which offers map data as a ROS Service. It also provides the map_saver command-line utility, which allows dynamically generated maps to be saved to file.
Maps manipulated by the the tools in this package are stored in a pair of files. The YAML file describes the map meta-data, and names the image file. The image file encodes the occupancy data.
http://www.ros.org/wiki/map_server
----
Other resources:
Navigator Stack and Stage:
Simple tutorial that sets up navigation stack and rosstage. Can be used by any new beginner just to see how awesome and simple ROS is
...
Well trying the tutorial everything went fine until I followed the step #5. At the last command I recieved an error message like this:

So I went to the .cc code and found the part of the code where that error message was generated:

I coulnd't find where actually the error was, so I decided to change the !=4 to !=3 and see what happens...
After making stage I ran the willow.world once again...
It didn't work, I changed the values first and then the message and it didn't change, I also rosmake stage and nothing... It seems to bee usign another code, because in all the extension of the model.cc there is no other message like that, I also might be reading a copy of that code in another part... so I will follow all the instructions again and see if it works well...
---
roscp is a useful commandline tool for copying files from one package to another.
pr2 throws a robot on map =D
------
map_server
Provides the map_server ROS Node, which offers map data as a ROS Service. It also provides the map_saver command-line utility, which allows dynamically generated maps to be saved to file.
Maps manipulated by the the tools in this package are stored in a pair of files. The YAML file describes the map meta-data, and names the image file. The image file encodes the occupancy data.
http://www.ros.org/wiki/map_server
----
Other resources:
Navigator Stack and Stage:
Simple tutorial that sets up navigation stack and rosstage. Can be used by any new beginner just to see how awesome and simple ROS is
miércoles, 8 de septiembre de 2010
To test navigation stack with both robots.
After the new actualization of the "To simulate two robots" ticket I need to run two robots in two maps. The commands I need to follow are these:
$ roscd simulator_stage
$ svn co `roslocate svn navigation_stage`
$ roslaunch navigation_stage move_base_multi_robot.launch
First of all I will check how does the twoRobots world run.
I think the problem might be around here:
oscar@oscar-laptop:/opt/ros/cturtle/stacks/sscrovers-ros-pkg$ rostopic echo robot_footprint
WARNING: topic [/robot_footprint] does not appear to be published yet
Because robot_footprint
robot_footprint (geometry_msgs/Polygon)
* Polygonal "footprint" around the robot. Rendered as a line.
I don't see any robot nor form on the map, and I should see it even in a corner of it.

I decided to try another example, in this case one using the same fake_localization node. I tried the move_base_fake_localization_10cm.launch example. But I had the the same problem. Then I decided to echo the different topics and see their messages, and I saw that many topics didn't publish anything, and the /odom topic published origin values.
After trying many ways to find the issue I decided to write a letter to the ROS community as follows:
HI everybody,
Im trying to run the launch/move_base_multi_robot.launch example launch file, it simulates two robots on different windows. But when the windows of nav_view opens I don't see anything but the map (image 1). Neither the inflated obstacles nor the particle cloud or the robot footprint seem to appear. I also looked for information in what was being published over those topics but there weren't any messages. I also receive a warning message when I run the launch file but I don't know if it has anything to do with it (Image 2):
[ WARN] [1285694547.646811796, 3.800000000]: The base_scan observation buffer has not been updated for 2.10 seconds, and it should be updated every 0.40 seconds.
This problem occurs also with the move_base_fake_localization_10cm.launch example, but in this case it opens a window from stage (Stage-3.2.2) and from there I can see the footprint of the robot (image 3). Also when I listen to the /odom topic (rostopic echo /odom) It prints the following (image 4):
wist:
twist:
linear:
x: 0.0
y: 0.0
z: 0.0
angular:
x: 0.0
y: 0.0
z: 0.0
covariance: [0.0, 0.0, 0.0, 0.0, 0.0, 0.0, 0.0, 0.0, 0.0, 0.0, 0.0, 0.0, 0.0, 0.0, 0.0, 0.0, 0.0, 0.0, 0.0, 0.0, 0.0, 0.0, 0.0, 0.0, 0.0, 0.0, 0.0, 0.0, 0.0, 0.0, 0.0, 0.0, 0.0, 0.0, 0.0, 0.0]
Could you please tell me the possible reason of why I cant see the footprints of the robot or anything else besides the map on the nav_view window?
The Version of Ubuntu I use is 10.4
The Version of ROS is CTurtle.
The Version of Stage is 3.2.2.
Image 1:

Image 2:

Image 3:

Image 4:

........
Chatting with Renato:
We saw that a a part of the launch file code is responsible of why in the multi robot example we don't see any stage map. When the stage node is declared there is a part where...
and if you delete it you can see now the stage map.
Actually when you set the goal on the nav_view map, the respective robot starts to move.
-----
Finally I could solve the problem by editing the rgb.txt file. Now both maps have their respective robots, and no important error seems to make problems on the simulation.
--
Oscar Rodrigo Hernández Panczenko IMT
Resources:
.pgm format: http://netpbm.sourceforge.net/doc/pgm.html
To see an image in terminal go to the directory where that image is and cast oeg:
http://netpbm.sourceforge.net/doc/pgm.html
------------------------------------
To see images cast eog "file"
To see pdf files cast xpdf "file"
------------------------------------
/rosout (roslib/Log)
* Standard ROS topic for publishing logging messages.
---------------------------------------
/clock Topic
Nodes are automatically subscribed to the /clock Topic, which is a global Topic published by a Clock Server. The Clock Server publishes regular time Messages (at an unspecified rate).
-------------------------------------
nav_view
Is a GUI for visualizing 2-D navigation. It is a specialized interface for the navigation stack.
nav_view displays:
* A map
* A robot's pose
* A cloud of particles (e.g., from a localization system)
* Two paths (e.g., from a path planner)
* A set of obstacles (and inflated obstacles)
http://www.ros.org/wiki/nav_view
--------------------------------------
fake_localization:
The fake_localization package provides a single node, fake_localization, which substitutes for a localization system, providing a subset of the ROS API used by amcl. This node is most frequently used during simulation as a method to provide perfect localization in a computationally inexpensive manner.
Specifically, fake_localization converts odometry data into pose, particle cloud, and transform data of the form published by amcl.
--------------------------------------
amcl:
amcl is a probabilistic localization system for a robot moving in 2D. It implements the adaptive (or KLD-sampling) Monte Carlo localization approach (as described by Dieter Fox), which uses a particle filter to track the pose of a robot against a known map.
http://www.ros.org/wiki/amcl
--------------------------------------
map_server
map_server provides the map_server ROS Node, which offers map data as a ROS Service. It also provides the map_saver command-line utility, which allows dynamically generated maps to be saved to file.
http://www.ros.org/wiki/map_server
--------------------------------------
cmd_vel:
cmd_vel geometry_msgs/Twist
* velocity commands to differentially drive the position model of the robot
http://www.ros.org/wiki/stage
--------------------------------------
navigation_stage
http://www.ros.org/wiki/navigation_stage
--------------------------------------
Information about some topics involved:
$ roscd simulator_stage
$ svn co `roslocate svn navigation_stage`
$ roslaunch navigation_stage move_base_multi_robot.launch
First of all I will check how does the twoRobots world run.
I think the problem might be around here:
oscar@oscar-laptop:/opt/ros/cturtle/stacks/sscrovers-ros-pkg$ rostopic echo robot_footprint
WARNING: topic [/robot_footprint] does not appear to be published yet
Because robot_footprint
robot_footprint (geometry_msgs/Polygon)
* Polygonal "footprint" around the robot. Rendered as a line.
I don't see any robot nor form on the map, and I should see it even in a corner of it.

I decided to try another example, in this case one using the same fake_localization node. I tried the move_base_fake_localization_10cm.launch example. But I had the the same problem. Then I decided to echo the different topics and see their messages, and I saw that many topics didn't publish anything, and the /odom topic published origin values.
After trying many ways to find the issue I decided to write a letter to the ROS community as follows:
HI everybody,
Im trying to run the launch/move_base_multi_robot.launch example launch file, it simulates two robots on different windows. But when the windows of nav_view opens I don't see anything but the map (image 1). Neither the inflated obstacles nor the particle cloud or the robot footprint seem to appear. I also looked for information in what was being published over those topics but there weren't any messages. I also receive a warning message when I run the launch file but I don't know if it has anything to do with it (Image 2):
[ WARN] [1285694547.646811796, 3.800000000]: The base_scan observation buffer has not been updated for 2.10 seconds, and it should be updated every 0.40 seconds.
This problem occurs also with the move_base_fake_localization_10cm.launch example, but in this case it opens a window from stage (Stage-3.2.2) and from there I can see the footprint of the robot (image 3). Also when I listen to the /odom topic (rostopic echo /odom) It prints the following (image 4):
wist:
twist:
linear:
x: 0.0
y: 0.0
z: 0.0
angular:
x: 0.0
y: 0.0
z: 0.0
covariance: [0.0, 0.0, 0.0, 0.0, 0.0, 0.0, 0.0, 0.0, 0.0, 0.0, 0.0, 0.0, 0.0, 0.0, 0.0, 0.0, 0.0, 0.0, 0.0, 0.0, 0.0, 0.0, 0.0, 0.0, 0.0, 0.0, 0.0, 0.0, 0.0, 0.0, 0.0, 0.0, 0.0, 0.0, 0.0, 0.0]
Could you please tell me the possible reason of why I cant see the footprints of the robot or anything else besides the map on the nav_view window?
The Version of Ubuntu I use is 10.4
The Version of ROS is CTurtle.
The Version of Stage is 3.2.2.
Image 1:

Image 2:

Image 3:

Image 4:

........
Chatting with Renato:
We saw that a a part of the launch file code is responsible of why in the multi robot example we don't see any stage map. When the stage node is declared there is a part where...
and if you delete it you can see now the stage map.
Actually when you set the goal on the nav_view map, the respective robot starts to move.
-----
Finally I could solve the problem by editing the rgb.txt file. Now both maps have their respective robots, and no important error seems to make problems on the simulation.
--
Oscar Rodrigo Hernández Panczenko IMT
Resources:
.pgm format: http://netpbm.sourceforge.net/doc/pgm.html
To see an image in terminal go to the directory where that image is and cast oeg:
http://netpbm.sourceforge.net/doc/pgm.html
------------------------------------
To see images cast eog "file"
To see pdf files cast xpdf "file"
------------------------------------
/rosout (roslib/Log)
* Standard ROS topic for publishing logging messages.
---------------------------------------
/clock Topic
Nodes are automatically subscribed to the /clock Topic, which is a global Topic published by a Clock Server. The Clock Server publishes regular time Messages (at an unspecified rate).
-------------------------------------
nav_view
Is a GUI for visualizing 2-D navigation. It is a specialized interface for the navigation stack.
nav_view displays:
* A map
* A robot's pose
* A cloud of particles (e.g., from a localization system)
* Two paths (e.g., from a path planner)
* A set of obstacles (and inflated obstacles)
http://www.ros.org/wiki/nav_view
--------------------------------------
fake_localization:
The fake_localization package provides a single node, fake_localization, which substitutes for a localization system, providing a subset of the ROS API used by amcl. This node is most frequently used during simulation as a method to provide perfect localization in a computationally inexpensive manner.
Specifically, fake_localization converts odometry data into pose, particle cloud, and transform data of the form published by amcl.
--------------------------------------
amcl:
amcl is a probabilistic localization system for a robot moving in 2D. It implements the adaptive (or KLD-sampling) Monte Carlo localization approach (as described by Dieter Fox), which uses a particle filter to track the pose of a robot against a known map.
http://www.ros.org/wiki/amcl
--------------------------------------
map_server
map_server provides the map_server ROS Node, which offers map data as a ROS Service. It also provides the map_saver command-line utility, which allows dynamically generated maps to be saved to file.
http://www.ros.org/wiki/map_server
--------------------------------------
cmd_vel:
cmd_vel geometry_msgs/Twist
* velocity commands to differentially drive the position model of the robot
http://www.ros.org/wiki/stage
--------------------------------------
navigation_stage
This package holds example launch files for running the ROS navigation stack in stage.
http://www.ros.org/wiki/navigation_stage
--------------------------------------
Information about some topics involved:
miércoles, 18 de agosto de 2010
Testing the Sick Laser
1) First I created a directory called:
~/Player_Stage/Laser_Test
Then I created there a file named sick.cfg (This idea was taked from Laura's Blogg).
The content of that file must be:
driver
(
name "sicklms200"
provides ["laser:0"]
port "/dev/ttyUSB1")
Then, after saving it you must execute these commands:
$ robot-player sick.cfg
$ robot-playerv
Then you are supposed to see the scan when you subscribe to the laser sick lms 200.
...
But following these steps I couldn't get the lecture of the laser, instead I got this error:
oscar@oscar-laptop:~/Player_Stage/Laser_Test$ robot-playerv
PlayerViewer 2.0.4
Connecting to [localhost:6665]
calling connect
done
Available devices: localhost:6665
laser:0 sicklms200 ready
playerc error : timed out waiting for server reply to request 6:0:3:1
playerv : error in dev_laser.c
libplayerc error: timed out waiting for server reply to request 6:0:3:1
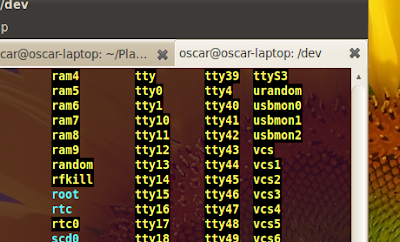
Then reading about the ports I accessed the /dev directory and looked up for the ttyUSB0 port, but I could not fin it. The ports I found that I think may be the usb ports are these:
usbmon0
usbmon1
usbmon2
...
Reading about usbmon on the web I got these info:
"3 The name "usbmon" in lowercase refers to a facility in kernel which is
4 used to collect traces of I/O on the USB bus. This function is analogous
5 to a packet socket used by network monitoring tools such as tcpdump(1)
6 or Ethereal. Similarly, it is expected that a tool such as usbdump or
7 USBMon (with uppercase letters) is used to examine raw traces produced
8 by usbmon.
9
10 The usbmon reports requests made by peripheral-specific drivers to Host
11 Controller Drivers (HCD). So, if HCD is buggy, the traces reported by
12 usbmon may not correspond to bus transactions precisely. This is the same
13 situation as with tcpdump.
So I need the ports ttyUSB0 and ttyUSB1.
Reading on Linux Forums I found this post, and it maybe the main reason of why I don't see the port on /dev:
"I don't know what exactly your device is. But my Palm use ttyUSB0 to sync with Ubuntu. The /dev directory is managed by udev, so every device file is created dynamically. What I see on my system is: when I connect my Palm to the usb port and push the sync button on Palm, the /dev/ttyUSB0 will be created on the fly. And after the sync is over, the /dev/ttyUSB0 gone too. So you might not see the /dev/ttyUSB0 device file if your device is not activated."
The next step is to try again the teleoperation of the Pioneer and see if the ttyUSB0 port is created at that instant.
...
It doesn't work, I get the next error:
ROSARIA/bin$ ./RosAria
[ INFO] [1282178888.412720880]: using serial port: [/dev/ttyUSB0]
ArLog::init: Could not open file aria.log for logging.
Could not connect to simulator, connecting to robot through serial port /dev/ttyUSB0.
ArSerialConnection::open: Could not open serial port '/dev/ttyUSB0'
Could not connect, because open on the device connection failed.
Failed to connect to robot.
rotate: Could not connect to robot! Exiting.
setup failed...
I don't have any idea of why ttyUSB0 doesn't appear. I will continue tomorrow.
------------------------------------------------------------------------------------
Testing the Laser With Aria.
First change the port from COM3 to ttyUSB0 (It depends in where you want to listen the Laser) in line 110 of p3dx.p in .../Aria/Aria/params
~/Player_Stage/Laser_Test
Then I created there a file named sick.cfg (This idea was taked from Laura's Blogg).
The content of that file must be:
driver
(
name "sicklms200"
provides ["laser:0"]
port "/dev/ttyUSB1")
Then, after saving it you must execute these commands:
$ robot-player sick.cfg
$ robot-playerv
Then you are supposed to see the scan when you subscribe to the laser sick lms 200.
...
But following these steps I couldn't get the lecture of the laser, instead I got this error:
oscar@oscar-laptop:~/Player_Stage/Laser_Test$ robot-playerv
PlayerViewer 2.0.4
Connecting to [localhost:6665]
calling connect
done
Available devices: localhost:6665
laser:0 sicklms200 ready
playerc error : timed out waiting for server reply to request 6:0:3:1
playerv : error in dev_laser.c
libplayerc error: timed out waiting for server reply to request 6:0:3:1
Then reading about the ports I accessed the /dev directory and looked up for the ttyUSB0 port, but I could not fin it. The ports I found that I think may be the usb ports are these:
usbmon0
usbmon1
usbmon2

...
Reading about usbmon on the web I got these info:
"3 The name "usbmon" in lowercase refers to a facility in kernel which is
4 used to collect traces of I/O on the USB bus. This function is analogous
5 to a packet socket used by network monitoring tools such as tcpdump(1)
6 or Ethereal. Similarly, it is expected that a tool such as usbdump or
7 USBMon (with uppercase letters) is used to examine raw traces produced
8 by usbmon.
9
10 The usbmon reports requests made by peripheral-specific drivers to Host
11 Controller Drivers (HCD). So, if HCD is buggy, the traces reported by
12 usbmon may not correspond to bus transactions precisely. This is the same
13 situation as with tcpdump.
So I need the ports ttyUSB0 and ttyUSB1.
Reading on Linux Forums I found this post, and it maybe the main reason of why I don't see the port on /dev:
"I don't know what exactly your device is. But my Palm use ttyUSB0 to sync with Ubuntu. The /dev directory is managed by udev, so every device file is created dynamically. What I see on my system is: when I connect my Palm to the usb port and push the sync button on Palm, the /dev/ttyUSB0 will be created on the fly. And after the sync is over, the /dev/ttyUSB0 gone too. So you might not see the /dev/ttyUSB0 device file if your device is not activated."
The next step is to try again the teleoperation of the Pioneer and see if the ttyUSB0 port is created at that instant.
...
It doesn't work, I get the next error:
ROSARIA/bin$ ./RosAria
[ INFO] [1282178888.412720880]: using serial port: [/dev/ttyUSB0]
ArLog::init: Could not open file aria.log for logging.
Could not connect to simulator, connecting to robot through serial port /dev/ttyUSB0.
ArSerialConnection::open: Could not open serial port '/dev/ttyUSB0'
Could not connect, because open on the device connection failed.
Failed to connect to robot.
rotate: Could not connect to robot! Exiting.
setup failed...
I don't have any idea of why ttyUSB0 doesn't appear. I will continue tomorrow.
------------------------------------------------------------------------------------
Testing the Laser With Aria.
First change the port from COM3 to ttyUSB0 (It depends in where you want to listen the Laser) in line 110 of p3dx.p in .../Aria/Aria/params
Starting with p2os
1) Install p2os following the p2os Getting Started Tutorial
2) Then I Tested the communication with the robot using RosAria.
First I Changed the usb port from port 1 to port 0. To do this you need to go to the ROASRIA package.
$ roscd ROSARIA
$ cd src
Then edit the RosAria.cpp file.
$ sudo gedit RosAria.cpp
and edit the line 80:
to
Make the package and then move to ROSARIA/bin
Then run a Core
$ roscore
Turn on the Pioneer, connect the usb-serial cable and run RosAria
./RosAria.
Finally you should see something like this:
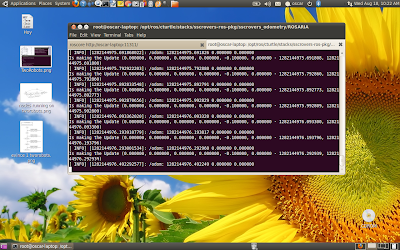
Retrieving information about robot's odometry.
You can also consult my other post to see the next steps about how to control the robot with the keyboard:
Controling Pioneer
2.1) Using the Keyboard to contorl de Pioneer.
Following the instructions of my other post I culnd't teleoperate the robot. I think is is because the latest relese of the svn of teleop_base publishes on a topic named /cmd_vel instead of /RosAria/cmd_vel. So now i'm modifying the RosAria.cpp file so it listens /RosAria/cmd_vel topic.
Note: It is localized in ROSARIA/src and the code i'm modifying is in the line 95 from this:
cmdvel_sub = n.subscribe( "/cmd_vel", 1, (boost::function < void(const geometry_msgs::TwistConstPtr&)>)
To this:
cmdvel_sub = n.subscribe( "/RosAria/cmd_vel", 1, (boost::function < void(const geometry_msgs::TwistConstPtr&)>)
Well Now the robot moves, but there's a little problem with RosAria, because it suddenly stops and the communication with the robot freezes. It stop updating the info...
[ INFO] [1282152720.503071698]: /odom: 1282152720.503030 0.000000 0.000000
It stops there. I will search for the problem later, now I will focus on the next task.
3)
2) Then I Tested the communication with the robot using RosAria.
First I Changed the usb port from port 1 to port 0. To do this you need to go to the ROASRIA package.
$ roscd ROSARIA
$ cd src
Then edit the RosAria.cpp file.
$ sudo gedit RosAria.cpp
and edit the line 80:
n.param( "port", serial_port, std::string("/dev/ttyUSB1") );
to
n.param( "port", serial_port, std::string("/dev/ttyUSB0") );
Make the package and then move to ROSARIA/bin
Then run a Core
$ roscore
Turn on the Pioneer, connect the usb-serial cable and run RosAria
./RosAria.
Finally you should see something like this:

Retrieving information about robot's odometry.
You can also consult my other post to see the next steps about how to control the robot with the keyboard:
Controling Pioneer
2.1) Using the Keyboard to contorl de Pioneer.
Following the instructions of my other post I culnd't teleoperate the robot. I think is is because the latest relese of the svn of teleop_base publishes on a topic named /cmd_vel instead of /RosAria/cmd_vel. So now i'm modifying the RosAria.cpp file so it listens /RosAria/cmd_vel topic.
Note: It is localized in ROSARIA/src and the code i'm modifying is in the line 95 from this:
cmdvel_sub = n.subscribe( "/cmd_vel", 1, (boost::function < void(const geometry_msgs::TwistConstPtr&)>)
To this:
cmdvel_sub = n.subscribe( "/RosAria/cmd_vel", 1, (boost::function < void(const geometry_msgs::TwistConstPtr&)>)
Well Now the robot moves, but there's a little problem with RosAria, because it suddenly stops and the communication with the robot freezes. It stop updating the info...
[ INFO] [1282152720.503071698]: /odom: 1282152720.503030 0.000000 0.000000
It stops there. I will search for the problem later, now I will focus on the next task.
3)
viernes, 13 de agosto de 2010
Simulating two robots in ROS
Following the instructions published in assembla I got the following results:
1.- First I created the file: twoRobots.launch in the directory:
And then I updated the file tworobots.launch located in:
2.- Run de launch file: roslaunch launch/tworobots.launch
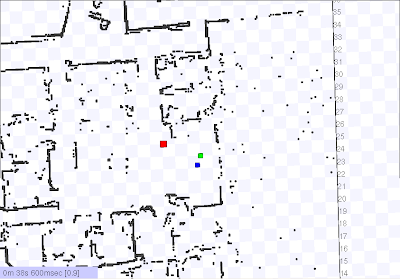
Now we can see the two robots on the map.
3.- Control the robots with the keyboard launching the tworobots2.launch file.
To control one robot I only need to use the keyboard while the terminal running tworobots.launch is in front of the other windows. To control de second robot I need to do the same thing but with the terminal running tworobots2.launch
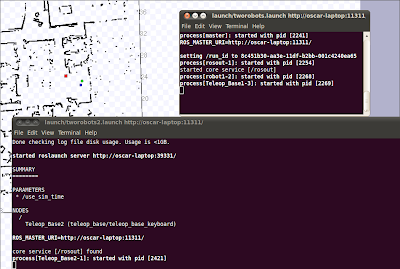
Test Navigation Stack with both robots.
Here we can see the nodes teleop_base1 and teleop_base2, as well as the topics of cmd_vel for robot0 and robot1.
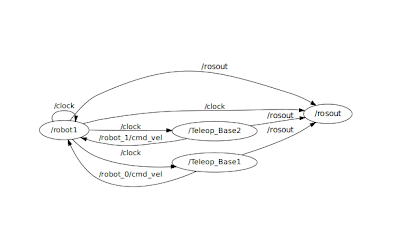
The odometry of both robots is done separately, in this case we can't see the lasers of the robots on the map because of the version of ROS and the Ubuntu Release that I have. I really don't know why that problem exists but I hope I will know how to solve it soon.
Regards.
1.- First I created the file: twoRobots.launch in the directory:
/opt/ros/cturtle/stacks/simulator_stage/stage/world
And then I updated the file tworobots.launch located in:
/opt/ros/cturtle/stacks/sscrovers-ros-pkg/launch
2.- Run de launch file: roslaunch launch/tworobots.launch

Now we can see the two robots on the map.
3.- Control the robots with the keyboard launching the tworobots2.launch file.
To control one robot I only need to use the keyboard while the terminal running tworobots.launch is in front of the other windows. To control de second robot I need to do the same thing but with the terminal running tworobots2.launch

Test Navigation Stack with both robots.
Here we can see the nodes teleop_base1 and teleop_base2, as well as the topics of cmd_vel for robot0 and robot1.

The odometry of both robots is done separately, in this case we can't see the lasers of the robots on the map because of the version of ROS and the Ubuntu Release that I have. I really don't know why that problem exists but I hope I will know how to solve it soon.
Regards.
miércoles, 11 de agosto de 2010
ROSDEP
This is a little post of how to use rosdep.
Use rosdep and rosmake to build any package in the ROS repository.
"Say that you want to build a package called AMAZING_PACKAGE, that you hadn't built on your machine before."
"What's happening under the hood"
1. rosdep uses rosmake to find all system dependencies recursively
2. rosdep looks up how to resolve the system dependencies for the OS running using the rosdep.yaml files.
3. rosdep tries to detect what is installed on your system already
4. rosdep generates a bash script to install all missing system dependencies
5. rosdep executes the bash script
To view the bash script before executing run
rosdep satisfy AMAZING_PACKAGE
Use rosdep and rosmake to build any package in the ROS repository.
"Say that you want to build a package called AMAZING_PACKAGE, that you hadn't built on your machine before."
rosdep install AMAZING_PACKAGE
"What's happening under the hood"
1. rosdep uses rosmake to find all system dependencies recursively
2. rosdep looks up how to resolve the system dependencies for the OS running using the rosdep.yaml files.
3. rosdep tries to detect what is installed on your system already
4. rosdep generates a bash script to install all missing system dependencies
5. rosdep executes the bash script
To view the bash script before executing run
rosdep satisfy AMAZING_PACKAGE
Suscribirse a:
Entradas (Atom)